
I have a love-hate relationship with fill in flash. I love the way that it separates a subject from a background. It helps add depth, lightens shadows. Lot’s of pluses…… But, I hate the way it’s so obvious. You normally get a very distinct shadow, or drop shadow, coming off the back of the subject, or to the right/rear if you happen to be shooting vertically.
If you are not familiar with this technique, it’s normally used when a subject is backlit (or maybe sidelit….or just plain underlit) outside. Normally you would get deep and dark shadows across their face or the part of your subject that is facing the camera….but with fill flash, you use your flash or strobe to “fill” in those shadows so that your subject is more evenly illuminated. Nowadays, a lot of DSLR’s and even point and shoot cameras have a Flash Fill setting that will give you the desired effect.
There are a few ways to get around the dreaded drop shadow that is the normal telltale sign of fill flash. The easiest is to simply point your flash at the ceiling or a nearby wall (if you are inside) or use a bounce reflector that hooks onto your flash (if you are outside). These work somewhat, but they don’t always eliminate the shadow. They also cut about two stops of power off your flash. And, if your flash isn’t adjustable directionally, you are out of luck.
A fellow photographer, Jim Bastardo, was telling me that he had started using a ringflash for some indoor lifestyle/party shoots that he had been doing. It didn’t have the obvious look of an on-camera flash, and didn’t necessitate him having to light an entire party scene to be able to move through it photographing lots of people. That got me wondering about other uses for this tool that is normally used for macro photography. A ringflash (or ringlight) hooks onto your camera and actually surrounds the lens so that the light seems to be coming from directly behind the lens….thereby eliminating any shadow.
I had purchased one, and was looking for a good way to test it out. I really enjoy combining auxiliary lighting with fast moving adventure sports, and came up with the idea of shooting a cyclist on a road bike during a descent of a hill. I really wanted the photograph to have the feeling of speed, and there were two ways to achieve this.
1. Have the cyclist ride past me while I was on the side of the road and use a “panning” action to photograph him as he rode by. This would work but I was figuring on having to take 20-30 shots to get something that I would be happy with. That would mean my model would have to ride by me 20-30 times, then stop, turn around, and ride back uphill for the next attempt. Most of my friends are pretty good sports, but I figured that would really be pushing the limit……
2. The other option, and the one that I decided to use, was to sit in the back of a car with my camera and have the cyclist follow me down the road. I contacted my friend Justin Jensen who said he was up for modeling for me. I also asked my girlfriend (now wife) Jennie if she would be willing to volunteer her car and her driving skills.
We gathered at the top of the road to our local ski resort, and the three of us had a discussion on how to keep us all safe. Jennie had to drive with one eye on the road and one eye on the rear view mirror making sure that Justin was still behind us and that I hadn’t fallen out of the car. Justin had to keep approximately the same distance from the car the whole time and listen to me as I yelled instructions. I laid on my stomach in the back of the Subaru with the hatchback open and held my camera out, sometimes up to my eye, but sometimes as low as I could get it to the ground to get an aggressive angle.
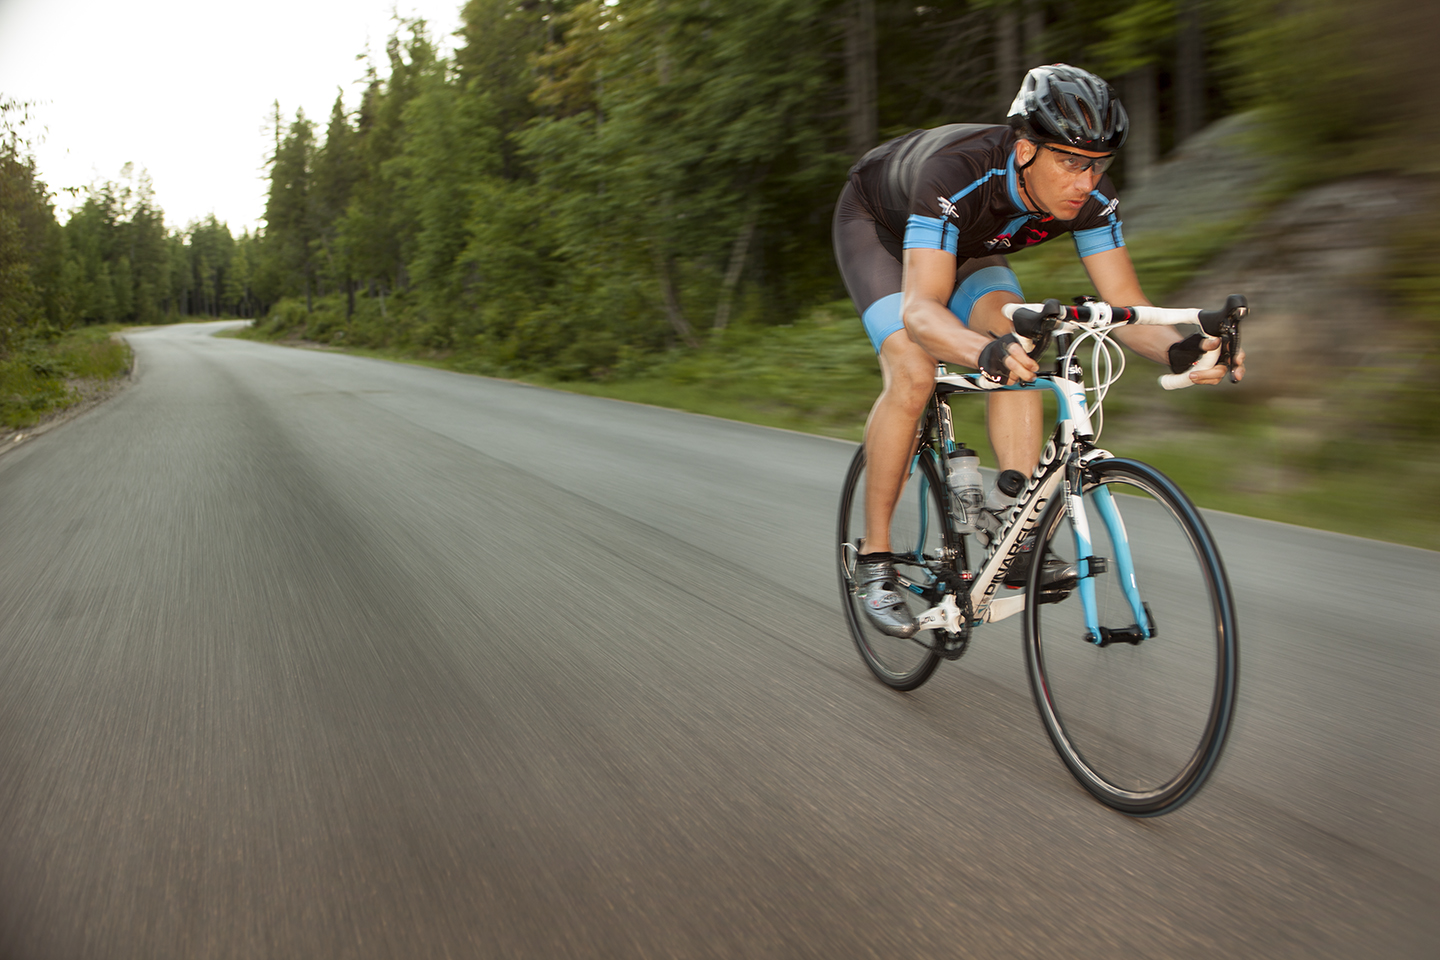
I thought we might have to make 2-3 trips up and down the mountain, but in the end I was really happy with what we got during our first descent. We kept our speed between 20-25 MPH, and I shot at 1/30 of a second to get a little bit of blur in the background, but minimize it on Justin. The ringlight functioned perfectly, actually working as a keylight as we had waited until we were totally in shadow so that I didn’t have to fight the sun coming from different directions as we made our way around the switchbacks.
As you can see in the photo, Justin is illuminated a touch brighter than the background, which really makes him standout. There also isn’t any shadow coming from the ringlight, thereby eliminating any hints about how it was lit. There is a nice amount of blur in the foreground/background to give the feeling of speed. All in all, everything worked out perfectly and I was extremely happy with the results.
Thanx for listening.